Summary
Every AI tool you've wired up by hand (the Slack integration, the database lookup, the "let the model read our docs" hack) is a one-off. You wrote the glue, you own the glue, and the next model or the next client can't use any of it. The Model Context Protocol is the fix: one open standard for how an AI app talks to your tools, your data, and your prompts, so you build the integration once and every MCP-aware client (Claude Code, Claude Desktop, Cursor, and a growing list) can use it.
This is the guide I'd hand a competent developer who keeps hearing "MCP" and wants to actually build one instead of nodding along. We start from the problem it solves, get the mental model straight (hosts, clients, servers, and the three things a server exposes (tools, resources, prompts)) then build a real server from an empty folder: a tool the model can call, a resource it can read, a prompt it can reuse. We test it with the Inspector, wire it into Claude and Cursor, then take it remote over Streamable HTTP and talk honestly about the security boundary you're now responsible for.
By the end you'll understand exactly what's happening when a model "uses a tool," and you'll have shipped a server you can point any MCP client at.
This is a living document and will be updated as the protocol and SDKs evolve.
Why MCP Exists
Before you write a line of MCP code, it's worth being clear on what problem it actually solves, because if you don't feel the problem, the protocol looks like ceremony.
The N×M problem
Say you want your AI app to do useful things: read from Postgres, search your company wiki, open GitHub issues, post to Slack. Each of those is an integration. You write a function, describe it to the model, parse the model's request, call the function, hand back the result. Fine.
Now you have a second AI app, a different chat UI, or you switch from one model to another, or your teammate is building in a different framework. None of that glue carries over. Every integration is welded to the one app that uses it. With M tools and N apps, you're staring down N×M bespoke connectors, and you maintain all of them.
This is the exact shape of a problem standards are good at. USB did it for peripherals. The Language Server Protocol did it for editors and language tooling, before LSP, every editor needed a custom plugin for every language; after it, a language ships one server and every LSP-aware editor gets it for free. MCP is that idea pointed at AI applications and the tools, data, and prompts they need.
What MCP standardizes
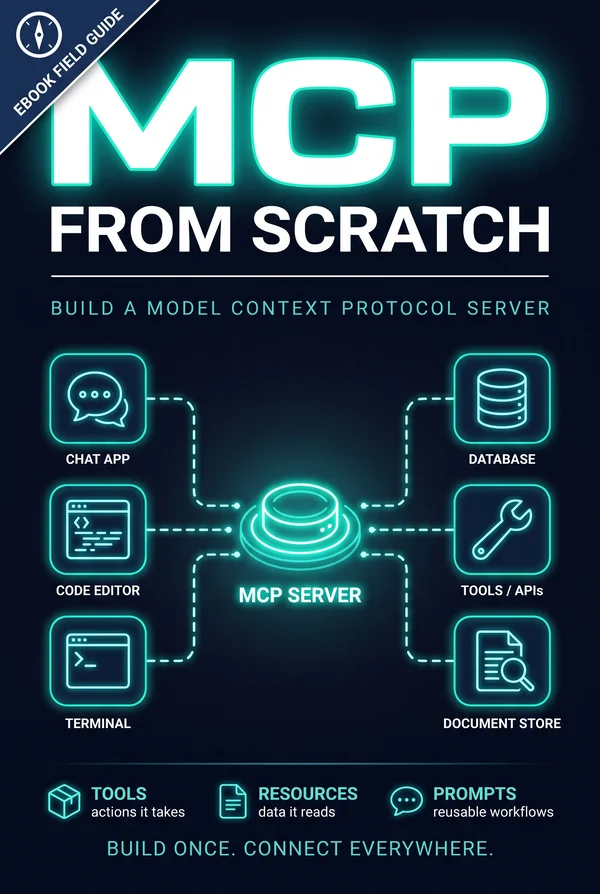
The Model Context Protocol is an open standard (originally from Anthropic, now with a broad ecosystem) that defines a single way for an AI application to connect to external capabilities. You build an MCP server that exposes what you've got, and any MCP client can consume it: Claude Desktop, Claude Code, Cursor, and a growing list of others, without you writing a thing specific to any of them.
The payoff is leverage. Write a server that talks to your database once, and it works in every client your team uses, today and the next one they adopt. The integration outlives the app.
What it is not
MCP is not a model, not an SDK for calling an LLM, and not a replacement for your API. It's the layer between a model-powered app and your stuff, a protocol, in the boring, durable sense of the word. Under the hood it's JSON-RPC 2.0 messages over a transport, which is a detail the SDK handles for you. You'll spend your time describing capabilities, not marshalling frames.
With the why in hand, let's get the mental model straight before we build.
The Mental Model: Hosts, Clients, Servers
MCP has a small vocabulary, and getting it straight now saves a lot of confusion later. There are three roles and three things a server can expose.
Host, client, server
- Host: the AI application the user actually interacts with. Claude Desktop, Claude Code, Cursor. The host runs the model and decides when to reach for outside help.
- Client: a connector that lives inside the host. The host spins up one client per server it connects to, and that client speaks MCP to exactly one server. One host, many clients, many servers.
- Server: your program. It exposes capabilities and answers requests. It knows nothing about the model; it just responds to a client.
The clean separation is the whole point: your server doesn't care which host is on the other end, and the host doesn't care how your server is implemented. They agree on the protocol and otherwise mind their own business.
The three things a server exposes
MCP servers offer up to three kinds of capability, and the distinction between them is the most important thing in this guide:
- Tools: actions the model can take. "Create an issue," "run this query," "send the email." Tools are model-controlled: the model decides to call them, based on your description. They can have side effects.
- Resources: data the model can read. A file, a config blob, a row from a database, the contents of a URL. Resources are application-controlled: think of them as GET-like, idempotent, no side effects, context you make available, not actions you invoke.
- Prompts: reusable, parameterized message templates the user (or host) can invoke. "Review this code," "summarize this PR." Prompts are user-controlled: they typically surface as slash commands or menu items the user picks deliberately.
A useful way to hold it: tools are for the model, resources are for the application, prompts are for the user. Who is in control of pulling the trigger is different in each case, and that's by design.
Transports
Finally, client and server need a channel. MCP defines two main ones:
- stdio: the server runs as a local subprocess and talks over standard input/output. Simple, fast, no network. This is how local servers connect to a desktop client, and where we'll start.
- Streamable HTTP: the server runs as a web service and talks over HTTP (with Server-Sent Events for streaming). This is how you run a remote server that lives somewhere other than the user's machine.
Same protocol, same capabilities, different pipe. You can support either or both, and, importantly, your tool/resource/prompt code doesn't change when you switch. Let's build the simplest possible version of all this.
Your First Server
Enough theory. Let's stand up a working server from an empty folder. We'll use TypeScript and the official SDK; the same concepts map directly to the Python SDK if that's your world.
Scaffold
mkdir weather-mcp && cd weather-mcp
npm init -y
npm install @modelcontextprotocol/sdk zod
npm install -D typescript @types/node
npx tsc --init
@modelcontextprotocol/sdk is the official server/client SDK. zod is for input validation, the SDK uses it to describe and validate tool arguments, which is also what generates the schema the model sees.
In package.json, set the module type and an entry point so Node treats your .ts-compiled output as ESM:
{
  "type": "module",
  "bin": { "weather-mcp": "./build/index.js" }
}
And in tsconfig.json, make sure you're emitting modern modules to a build/ directory: "module": "Node16", "target": "ES2022", "outDir": "./build".
The smallest real server
Create src/index.ts:
import { McpServer } from "@modelcontextprotocol/sdk/server/mcp.js";
import { StdioServerTransport } from "@modelcontextprotocol/sdk/server/stdio.js";
import { z } from "zod";

const server = new McpServer({
  name: "weather-mcp",
  version: "1.0.0",
});

server.registerTool(
  "get_forecast",
  {
    title: "Get forecast",
    description: "Get a short weather forecast for a city.",
    inputSchema: { city: z.string().describe("City name, e.g. 'Vancouver'") },
  },
  async ({ city }) => {
    // Pretend this is a real API call.
    const forecast = `Forecast for ${city}: 14°C, light rain, gentle wind.`;
    return { content: [{ type: "text", text: forecast }] };
  },
);

async function main() {
  const transport = new StdioServerTransport();
  await server.connect(transport);
  // Note: log to stderr, never stdout — stdout is the protocol channel.
  console.error("weather-mcp running on stdio");
}

main().catch((err) => {
  console.error("Fatal:", err);
  process.exit(1);
});
That's a complete, valid MCP server. Three moving parts: create an McpServer, register a tool (name, metadata + input schema, handler), and connect it to a transport.
The one gotcha that bites everyone
Over stdio, stdout is the protocol channel, the client is reading JSON-RPC frames from it. If you console.log() a debug line, you've just injected garbage into the protocol stream and the client will choke. Always log to stderr (console.error). Burn this in now; it's the single most common reason a beginner's stdio server mysteriously fails to connect.
Build and sanity-check
npx tsc
node build/index.js
It'll sit there silently (besides your stderr line) waiting for a client to talk to it over stdin, which is exactly right. You can't usefully poke it by hand; for that you want the Inspector, which we'll get to. First, let's go deeper on the three capabilities, starting with tools.
Tools: Letting the Model Act
Tools are the capability you'll reach for most, because they're how a model does things instead of just talking about them. Let's go past the toy example.
Anatomy of a tool
registerTool takes three arguments: a name, an options object, and a handler.
server.registerTool(
  "create_issue",
  {
    title: "Create GitHub issue",
    description:
      "Open a new issue in a repository. Use when the user asks to file, log, or report a bug or task.",
    inputSchema: {
      repo: z.string().describe("owner/name, e.g. 'acme/web'"),
      title: z.string(),
      body: z.string().optional(),
    },
  },
  async ({ repo, title, body }) => {
    const issue = await github.createIssue(repo, title, body ?? "");
    return {
      content: [{ type: "text", text: `Opened ${repo}#${issue.number}: ${issue.url}` }],
    };
  },
);
The description is not documentation for you. It's the prompt the model reads to decide whether and when to call this tool. Be prescriptive about when to use it, not just what it does. "Use when the user asks to file, log, or report…" earns its keep. Same for each field's .describe(): those become the per-argument hints the model sees.
Input schemas validate for free
Because the input schema is Zod, the SDK validates arguments before your handler ever runs. If the model sends a malformed call, it's rejected with a schema error and your handler isn't invoked with junk. You write z.string(), z.number(), z.enum([...]), .optional(), and you get both the model-facing schema and runtime validation from the same declaration.
Returning results
A tool returns a content array. The common case is text:
return { content: [{ type: "text", text: "Done." }] };You can also return structured content alongside text when a tool has a machine-readable result, declare an outputSchema and return structuredContent:
{
  inputSchema: { weightKg: z.number(), heightM: z.number() },
  outputSchema: { bmi: z.number() },
}
// handler:
const bmi = weightKg / (heightM * heightM);
return {
  content: [{ type: "text", text: JSON.stringify({ bmi }) }],
  structuredContent: { bmi },
};
Errors belong in the result, not as throws
When a tool fails meaningfully (the repo doesn't exist, the API returned 403) don't throw. Return an error result so the model can see what happened and adapt:
return {
  content: [{ type: "text", text: "Repo not found or no access." }],
  isError: true,
};
Throwing is for genuine bugs; isError: true is for "the action failed and here's why", which is information the model can actually use to try something else.
Annotations: hinting at behavior
You can attach annotations that tell the host about a tool's nature. Most usefully destructiveHint and idempotentHint:
{
  description: "Delete a file from the project.",
  inputSchema: { path: z.string() },
  annotations: { title: "Delete file", destructiveHint: true, idempotentHint: true },
}
These are hints, not enforcement, but a good host can use destructiveHint to decide it should ask the user for confirmation before letting the model run this. Mark destructive tools honestly; it's the difference between a host that can protect your users and one that can't.
Tools let the model act. Next, the other side of the coin, letting it read.
Resources: Letting the Model Read
If tools are verbs, resources are nouns. A resource is a piece of data your server makes available for the model to read into context, a file, a config value, a record, a rendered document. The defining trait: reading a resource has no side effects. Think GET, not POST.
A static resource
The simplest resource is addressable at a fixed URI:
server.registerResource(
  "app-config",
  "config://app",
  {
    title: "Application config",
    description: "Current application configuration as JSON.",
    mimeType: "application/json",
  },
  async (uri) => ({
    contents: [
      { uri: uri.href, text: JSON.stringify(loadConfig(), null, 2) },
    ],
  }),
);
The URI scheme (config://, file://, db://, whatever you like) is yours to design. It's an identifier, not a network address. The handler returns a contents array; each entry carries the uri it answers for and either text or, for binary, a base64 blob.
Dynamic resources with templates
Most real data is parameterized: "any user by id," "any doc by slug." For that, use a ResourceTemplate with a parameterized URI:
import { ResourceTemplate } from "@modelcontextprotocol/sdk/server/mcp.js";

server.registerResource(
  "user",
  new ResourceTemplate("users://{userId}", { list: undefined }),
  {
    title: "User record",
    description: "Profile data for a single user.",
  },
  async (uri, { userId }) => {
    const user = await db.getUser(userId);
    return {
      contents: [{ uri: uri.href, text: JSON.stringify(user) }],
    };
  },
);
Now users://42 resolves to user 42, and the userId is parsed out of the URI and handed to your handler. This is how you expose a whole collection through one registration.
Tools vs. resources: picking the right one
This trips people up, so here's the rule: if calling it changes something, it's a tool; if it only reads, it's a resource. "Search the wiki" sounds read-only, but if you want the model to decide to invoke it mid-reasoning, a tool is often the pragmatic choice, because tools are model-controlled and resources are application-controlled, the host decides which resources to pull in.
In practice today, tool support is the most universally implemented part of MCP across clients, and resources/prompts support varies. So a useful heuristic: if you need something to work everywhere right now, a tool is the safe bet; reach for resources when the host you're targeting supports them and the data is genuinely read-only context. Don't agonize. You can expose the same underlying data both ways if it helps.
With reading and acting covered, the last capability is the one aimed at the human in the loop.
Prompts: Reusable Workflows
The third capability is the one people forget exists, and it's genuinely useful: prompts are reusable, parameterized message templates that the user invokes deliberately, usually surfaced as a slash command or a menu item in the host.
Why prompts are a server capability
You could ask any of these by hand. The point of packaging them on the server is that they travel with the integration. Ship a code_review prompt with your code-tools server and every user of that server gets a consistent, well-engineered review prompt without copy-pasting it around. It's a way to bottle your team's best prompt patterns and distribute them.
Registering a prompt
server.registerPrompt(
  "review_code",
  {
    title: "Review code",
    description: "Produce a focused code review of a snippet.",
    argsSchema: { code: z.string(), focus: z.string().optional() },
  },
  ({ code, focus }) => ({
    messages: [
      {
        role: "user",
        content: {
          type: "text",
          text:
            `Review the following code${focus ? ` with attention to ${focus}` : ""}. ` +
            `Call out correctness bugs first, then maintainability. Be specific and cite lines.\n\n` +
            "```\n" + code + "\n```",
        },
      },
    ],
  }),
);
A prompt handler returns a messages array, the conversation the host will seed when the user picks this prompt. The user supplies code (and optionally focus), the host fills them in, and the assembled messages go to the model.
Arguments and completion
Because arguments are declared in argsSchema, the host can render a little form when the user invokes the prompt: a field for code, a field for focus. Some hosts also support argument completion, suggesting valid values as the user types, which the SDK exposes via a completable() wrapper around an argument. That's a nice-to-have; the core idea is just "a named, parameterized message template the user triggers on purpose."
Where prompts fit
Keep the control distinction in mind, because it's the whole reason these are three separate things:
- Tools: the model decides to call them.
- Resources: the application/host decides to include them.
- Prompts: the user decides to invoke them.
A mature server often ships all three: tools to act, resources to read, and a handful of prompts that encode the workflows your team runs over and over. Now that you've got something worth running, let's actually run it, with the Inspector.
Testing with the Inspector
You don't want to debug a server by wiring it into Claude and squinting at why nothing happens. The MCP project ships a dedicated tool for exactly this: the Inspector, a local web UI that connects to your server and lets you exercise every capability by hand.
Launching it
No install needed, run it against your built server:
npx @modelcontextprotocol/inspector node build/index.jsThat starts the Inspector, which launches your server as a subprocess over stdio and opens a browser UI. If your server takes arguments or env vars, pass them through:
npx @modelcontextprotocol/inspector node build/index.js --arg value
# env vars: prefix them, e.g.
GITHUB_TOKEN=ghp_xxx npx @modelcontextprotocol/inspector node build/index.js
What you can do in it
The Inspector gives you a tab per capability:
- Tools: see every registered tool, its description, and its input schema; fill in arguments and call it; inspect the exact result the model would receive (including
isErrorand anystructuredContent). - Resources: browse what's exposed, resolve a URI (including templated ones), and view the returned contents.
- Prompts: pick a prompt, fill in its arguments, and see the assembled messages.
There's also a notifications/log pane that surfaces what's happening on the wire. This is where you catch the classics: a tool that throws instead of returning isError, a resource handler that forgets to set uri on its contents, or, the perennial favorite, a stray console.log corrupting the stdio stream (you'll see the connection fail outright).
A tight feedback loop
The workflow that keeps you sane:
- Edit
src/index.ts. npx tsc(or runtsc --watchin a second terminal).- Restart the Inspector against the fresh build.
- Call the tool, read the result, repeat.
Get each capability working in the Inspector before you connect it to a real host. Ninety percent of "my server doesn't work in Claude" turns out to be "my server doesn't work," and the Inspector tells you that in seconds instead of after a frustrating round-trip through a host's config and logs. Once it's green in the Inspector, wiring it into a real client is the easy part, which is next.
Wiring It Into Claude (and Cursor)
Your server passes in the Inspector. Now let's put it in front of a real model. For a local stdio server, connecting to a host is almost entirely a matter of telling the host how to launch it.
Claude Desktop
Claude Desktop reads a JSON config file that lists the MCP servers it should start. On macOS it lives at ~/Library/Application Support/Claude/claude_desktop_config.json (on Windows, %APPDATA%\Claude\claude_desktop_config.json). Add your server under mcpServers:
{
  "mcpServers": {
    "weather": {
      "command": "node",
      "args": ["/absolute/path/to/weather-mcp/build/index.js"]
    }
  }
}
Two things people get wrong here:
- Use an absolute path. The host isn't running from your project directory; a relative path won't resolve.
- Pass env vars explicitly if your server needs them, via an
"env"object alongsidecommand/args, the host doesn't inherit your shell's environment:
{
  "mcpServers": {
    "weather": {
      "command": "node",
      "args": ["/absolute/path/to/build/index.js"],
      "env": { "WEATHER_API_KEY": "sk-..." }
    }
  }
}
Restart Claude Desktop fully (quit, not just close the window). Your tools should now appear, and you can ask the model something that nudges it toward your tool, "what's the forecast for Vancouver?", and watch it call get_forecast.
Claude Code
Claude Code speaks MCP too, and you add servers from the CLI rather than hand-editing JSON:
claude mcp add weather node /absolute/path/to/build/index.jsIt also supports project-scoped servers (checked into the repo so your whole team gets them) and listing/removing servers with claude mcp list / claude mcp remove. Same protocol, friendlier ergonomics.
Cursor
Cursor uses the same shape of config, an mcpServers map with command and args, in its MCP settings (a mcp.json you can edit from Cursor's settings UI). The exact location moves around as the app evolves, so add it through the settings panel rather than memorizing a path. The server you wrote is unchanged; you're just telling a different host how to launch the same binary.
The portability payoff, made real
This is the moment the whole premise pays off: you wrote one server, and the only thing that differs between Claude Desktop, Claude Code, and Cursor is a few lines of host-specific config telling each how to start the process. Your tools, resources, and prompts, untouched. That's the leverage MCP promised in chapter one, now sitting in three different apps from a single codebase.
Local stdio servers are the right default. But sometimes the server can't live on the user's machine, and that's when you go remote.
Going Remote: Streamable HTTP
Stdio is perfect when the server runs on the same machine as the host. But plenty of servers can't: a shared company server that wraps an internal API, a SaaS that exposes its product to any customer's AI client, anything that needs to run centrally rather than on each user's laptop. For those, MCP defines the Streamable HTTP transport, the same protocol, served over HTTP.
When you actually want this
Reach for HTTP when:
- The server holds credentials or talks to infrastructure you don't want on end-user machines.
- You want one deployment serving many users, updated centrally.
- You're building a product where customers connect their AI client to your hosted server.
If it's a personal or local-only integration, stay on stdio. It's simpler and there's no network surface to secure.
The shape of an HTTP server
The capability code, your registerTool / registerResource / registerPrompt calls, doesn't change at all. Only the transport does. With Express:
import express from "express";
import { McpServer } from "@modelcontextprotocol/sdk/server/mcp.js";
import { StreamableHTTPServerTransport } from "@modelcontextprotocol/sdk/server/streamableHttp.js";
import { randomUUID } from "node:crypto";

function buildServer() {
  const server = new McpServer({ name: "weather-mcp", version: "1.0.0" });
  // ... registerTool / registerResource / registerPrompt, exactly as before ...
  return server;
}

const app = express();
app.use(express.json());

app.post("/mcp", async (req, res) => {
  // A real implementation manages a transport per session; this is the shape.
  const transport = new StreamableHTTPServerTransport({
    sessionIdGenerator: () => randomUUID(),
  });
  const server = buildServer();
  await server.connect(transport);
  await transport.handleRequest(req, res, req.body);
});

app.listen(3000, () => console.error("weather-mcp on http://localhost:3000/mcp"));
The client POSTs JSON-RPC messages to your /mcp endpoint; the transport can stream responses back over Server-Sent Events when needed. Sessions are tracked via a session id so a client's follow-up requests land on the right server instance. The SDK's docs and examples cover the full session-management lifecycle, reuse their pattern rather than hand-rolling it, because the bookkeeping (storing transports by session id, handling GET for the SSE stream, cleanup on disconnect) has sharp edges.
Connecting a client to a remote server
Hosts that support remote servers take a URL instead of a command. In Claude Code, for example:
claude mcp add --transport http weather https://mcp.example.com/mcpThe thing you cannot skip: auth
The moment your server is reachable over the network, it is exposed, and an MCP server is by definition a thing that runs actions and returns data. A remote MCP server without authentication is an open door to whatever it wraps. MCP's spec defines an OAuth 2.0-based authorization flow for exactly this, the server advertises protected-resource metadata, the client obtains a token, and requests carry a bearer token the server verifies. The SDK provides helpers for the metadata endpoints and bearer-token verification.
Don't treat auth as a later step you'll bolt on. If you're going remote, design it in from the first commit, which is a good segue into shipping responsibly.
Shipping It: Security, Packaging, What's Next
You've got a server that works in the Inspector and in a real host. Before you call it done, a few things separate a demo from something you'd let other people run.
Security: you are the boundary
An MCP server executes actions on behalf of a model, and the model's inputs are ultimately influenced by whatever's in its context, which can include untrusted text. Treat every tool argument as untrusted input, exactly as you would a request body from the public internet:
- Validate and constrain. The Zod schema gets you type validation for free; add the business rules yourself. A tool that takes a
pathmust confine it to an intended directory, resolve it and reject anything that escapes (.., absolute paths, symlinks). A tool that runs a query should use parameterized queries, never string-built SQL. - Scope credentials minimally. If your server holds an API token, give it the least privilege the job needs. The model can invoke any tool you expose; a broadly-scoped token is the blast radius when something goes wrong.
- Mark destructive tools. Use the
destructiveHintannotation honestly so hosts can gate dangerous actions behind user confirmation. - Never log secrets. And on stdio, remember stdout is sacred, secrets (or anything) on stdout corrupt the protocol and leak.
The model is not your security perimeter. Your server is. Write it like the input is hostile, because sometimes it will be.
Packaging and distribution
To let others run your server with no clone-and-build step, publish it to npm with a bin entry, and people can launch it via npx:
{
  "name": "weather-mcp",
  "bin": { "weather-mcp": "./build/index.js" },
  "files": ["build"]
}
Then a user's host config becomes just:
{
  "mcpServers": {
    "weather": { "command": "npx", "args": ["-y", "weather-mcp"] }
  }
}
Make sure your entry file starts with a shebang (#!/usr/bin/env node) so it's directly executable, document the env vars it needs, and you've got something installable in one line.
A pre-ship checklist
- Every tool returns
isError: trueon failure instead of throwing. - Nothing writes to stdout except the protocol (stdio servers).
- Tool descriptions tell the model when to call, not just what it does.
- Inputs are validated beyond their types; paths and queries are constrained.
- Remote servers require auth before they touch anything.
- It's green in the Inspector and you've watched a real host call it.
Where to go next
You now understand what's actually happening when a model "uses a tool". There's no magic, just a server you can write answering a well-specified protocol. From here, the interesting directions are: sampling (a server asking the host's model to complete something mid-tool, inverting the usual flow), roots (letting a server know which directories or URIs it's allowed to operate within), and richer resource subscriptions for data that changes. The protocol specification is surprisingly readable, and the SDK examples are the fastest way to see each feature working.
But the core is what you've already built: one server, every client, integration that outlives the app. That was the whole promise, and now you can ship on it.